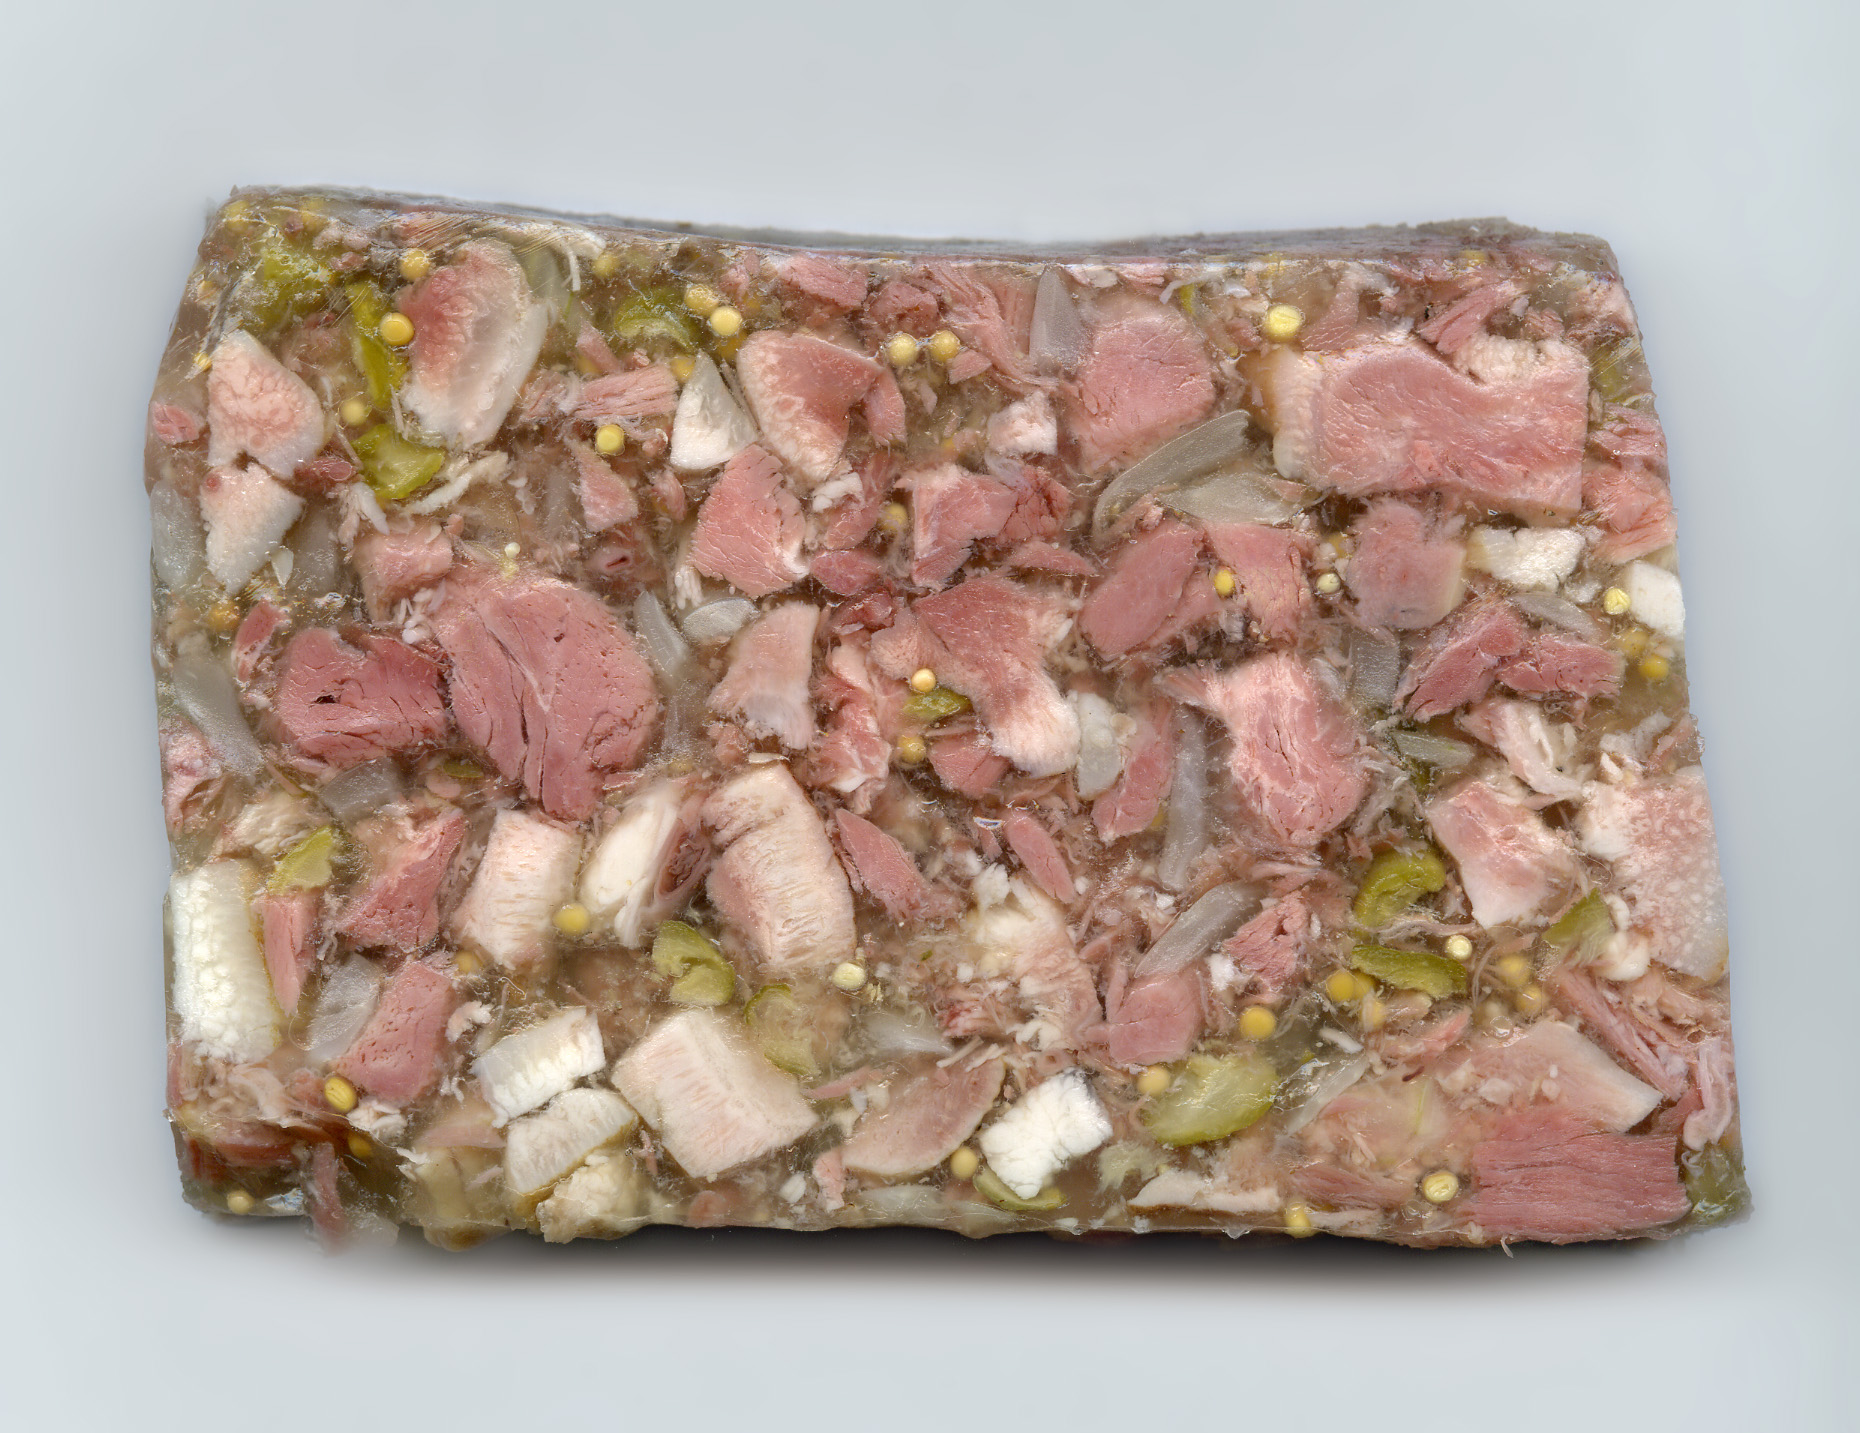
Estonian Sült – interesting jellied meat
Sült, also known as aspic or meat jelly, is a traditional dish that has been enjoyed for centuries across various cultures. This savory and flavorful delicacy is made by simmering meat and bones in a broth, allowing the natural gelatin to extract and create a firm, jelly-like texture. Whether you’re a seasoned home cook or a novice in the kitchen, mastering the art of Sült making can be a rewarding and delicious experience.
In this comprehensive guide, we’ll take you on a journey through the history, traditions, and step-by-step process of creating your own homemade Sült. From selecting the right ingredients to perfecting the cooking and cooling techniques, you’ll be equipped with the knowledge and skills to become a Sült-making pro. So, let’s dive in and explore the world of this captivating culinary delight!
The History and Tradition of Sült
Sült has a rich and storied history, with roots that can be traced back to ancient civilizations. This savory jelly-like dish was initially created as a way to preserve meat and extend its shelf life before the advent of modern refrigeration. The process of slowly simmering meat and bones in a broth allowed the natural gelatin to be extracted, resulting in a firm and flavorful Sült.
Over the centuries, Sült has become an integral part of the culinary heritage of many regions, each with its own unique variations and traditions. In some cultures, Sült is considered a delicacy, often served as an appetizer or a part of a larger feast. In others, it’s a beloved comfort food, enjoyed as a hearty main dish or a versatile ingredient in various recipes.
Regardless of its cultural origins, Sült has remained a beloved and enduring dish, captivating the palates of food enthusiasts around the world. By mastering the art of Sült making, you’ll not only be able to savor the flavors of this traditional dish but also connect with the rich history and culinary traditions that have shaped it.
The Essential Ingredients for Making Sült
At the heart of a delicious Sült lies a carefully curated selection of ingredients. While the exact recipe may vary depending on regional traditions, there are a few key components that are essential for creating an authentic and flavorful Sült:
- Meat and Bones: The foundation of Sült is the combination of meat and bones, typically from pork or beef. The gelatin-rich collagen found in the bones is what gives Sült its signature jelly-like texture.
- Aromatics: Onions, garlic, celery, and herbs like bay leaves, thyme, and parsley are commonly used to infuse the broth with a depth of flavor.
- Spices: Depending on the regional variations, Sült can be seasoned with a variety of spices, such as black pepper, allspice, cloves, or even a touch of cinnamon.
- Vinegar or Lemon Juice: A small amount of vinegar or lemon juice is often added to the Sült mixture to balance the richness and add a subtle tanginess.
- Salt: Proper seasoning with salt is crucial to enhance the overall flavor of the Sült.
- Gelatin: While the natural gelatin from the meat and bones is the primary thickening agent, additional powdered or sheet gelatin may be used to ensure a firm and consistent texture.
By carefully selecting and combining these essential ingredients, you’ll be well on your way to creating a Sült that is both authentic and tailored to your personal taste preferences.
Equipment and Tools Needed for Sült Making
Preparing a delicious Sült at home requires a few key pieces of equipment and tools. While the list may seem extensive, don’t worry – many of these items are likely already in your kitchen. Here’s what you’ll need:
- Stock Pot or Dutch Oven: A large, heavy-bottomed pot is essential for simmering the meat and bones to extract the gelatin.
- Cheesecloth or Muslin: These materials are used to strain the broth, ensuring a clear and smooth Sült.
- Ladle and Skimmer: A ladle and a skimmer will help you carefully transfer the Sült mixture and skim off any impurities or foam during the cooking process.
- Molds or Containers: Sült is typically set in various shapes and sizes, such as individual ramekins, loaf pans, or even decorative molds.
- Refrigerator: A reliable refrigerator is necessary for chilling and setting the Sült, as well as for storing the final product.
- Knife and Cutting Board: These basic kitchen tools will be used for slicing and serving the Sült.
- Thermometer: A digital or candy thermometer can be helpful in monitoring the temperature of the Sült mixture during the cooking and cooling stages.
- Mixing Bowls and Utensils: You’ll need various bowls and utensils for preparing the ingredients, mixing the Sült mixture, and incorporating any additional garnishes or flavors.
With this essential equipment and a bit of practice, you’ll be well on your way to becoming a Sült-making master in no time.
Step-by-Step Guide to Preparing the Meat and Gelatin Mixture
Now that you have the necessary ingredients and equipment, let’s dive into the step-by-step process of preparing the Sült:
- Choose Your Meat and Bones: Select a combination of pork and/or beef bones, as well as some meaty cuts like pork hocks or beef shanks. The bones should be rich in collagen to ensure a firm and gelatinous Sült.
- Prepare the Meat and Bones: Rinse the meat and bones under cold water to remove any impurities. If desired, you can also roast the bones in the oven for 30-45 minutes to enhance their flavor.
- Create the Broth: Place the meat and bones in a large stock pot or Dutch oven, and cover them with cold water. Bring the mixture to a boil, then reduce the heat and let it simmer for 3-4 hours, skimming off any foam or impurities that rise to the surface.
- Add the Aromatics: During the last hour of simmering, add the chopped onions, garlic, celery, and any desired herbs and spices. This will infuse the broth with a rich and complex flavor.
- Strain the Broth: Once the broth has finished simmering, use a cheesecloth or muslin-lined strainer to carefully pour the liquid into a clean container, leaving behind the solids.
- Prepare the Gelatin: If you’re using powdered gelatin, sprinkle it over a small amount of cold water and let it bloom for 5-10 minutes. For sheet gelatin, soak the sheets in cold water until softened.
- Combine the Broth and Gelatin: Gently heat the strained broth and whisk in the bloomed or softened gelatin until it’s fully dissolved. Adjust the seasoning with salt and a touch of vinegar or lemon juice to taste.
- Pour into Molds: Carefully pour the Sült mixture into your desired molds or containers, making sure to leave enough headspace for the mixture to expand as it sets.
- Chill and Set: Refrigerate the Sült for several hours, or until it’s completely set and firm to the touch.
With these steps, you’ve successfully created the foundation for your homemade Sült. Now, let’s move on to the cooking and cooling process.
Cooking and Cooling the Sült
Once you’ve prepared the meat and gelatin mixture, it’s time to focus on the cooking and cooling stages of the Sült-making process. This is a crucial step that will ensure your Sült has the perfect texture and consistency.
- Cooking the Sült: Gently reheat the Sült mixture over low heat, stirring constantly, until it’s just heated through. Be careful not to let it boil, as this can cause the gelatin to break down and the Sült to become watery.
- Pouring into Molds: Carefully pour the warm Sült mixture into your prepared molds or containers, making sure to fill them evenly. If you’re using decorative molds, you may want to lightly oil the surfaces to help the Sült release easily.
- Cooling and Chilling: Once the Sült is poured, transfer the molds to the refrigerator and allow them to chill for at least 4-6 hours, or until the Sült is completely set and firm to the touch.
- Checking for Doneness: To test if the Sült is properly set, gently tap the top of the mold. The Sült should have a firm, jelly-like consistency and should not be overly soft or watery.
- Unmolding the Sült: When the Sült is fully set, carefully run a knife or offset spatula around the edges of the mold to loosen the Sült. Gently invert the mold onto a plate or serving platter, and the Sült should release smoothly.
- Chilling and Storing: If you’re not serving the Sült immediately, cover it with plastic wrap or transfer it to an airtight container and refrigerate until ready to use. Properly stored, homemade Sült can last up to a week in the fridge.
By following these steps, you’ll ensure that your Sült has the perfect texture and consistency, ready to be enjoyed or used in a variety of dishes.
Adding Garnishes and Flavors to Enhance the Sült
While the traditional Sült is delicious on its own, there are many ways to elevate and personalize your creation by incorporating various garnishes and flavors. Here are some ideas to consider:
- Vegetables and Herbs: Finely chopped carrots, celery, parsley, dill, or chives can be added to the Sült mixture before it sets, creating a visually appealing and flavorful presentation.
- Spices and Seasonings: Experiment with different spices, such as black pepper, allspice, cloves, or even a touch of paprika or cayenne, to add depth and complexity to your Sült.
- Pickled Ingredients: Sliced cornichons, pickled onions, or a drizzle of balsamic glaze can provide a tangy and crunchy contrast to the rich, gelatinous Sült.
- Cheese and Meats: Crumbled feta, shredded cheddar, or thinly sliced cured meats like prosciutto or salami can be layered or incorporated into the Sült for a more substantial and indulgent dish.
- Citrus Zest and Juice: A sprinkle of lemon, orange, or lime zest can brighten up the Sült, while a splash of their respective juices can add a refreshing acidity.
- Edible Flowers: For a visually stunning presentation, consider decorating your Sült with edible flowers, such as nasturtiums, marigolds, or viola petals.
Experiment with different combinations and flavors to find the perfect balance that suits your taste preferences and complements the traditional Sült.
Storing and Serving Sült
Proper storage and serving techniques are essential for ensuring your homemade Sült remains fresh and enjoyable. Here are some tips to keep in mind:
Storing Sült:
- Refrigerate the Sült in an airtight container or wrapped in plastic wrap for up to 1 week.
- Avoid stacking the Sült, as this can cause it to become misshapen or damaged.
- If freezing the Sült, wrap it tightly in plastic wrap or place it in a freezer-safe container and store for up to 3 months.
Serving Sült:
- Remove the Sült from the refrigerator about 15-20 minutes before serving to allow it to come to room temperature, which will enhance the flavor and texture.
- Slice the Sült using a sharp knife, making clean, even cuts.
- Arrange the Sült slices on a serving platter and garnish with any desired toppings, such as fresh herbs, pickled vegetables, or a drizzle of vinaigrette.
- Serve the Sült as an appetizer, a side dish, or as part of a larger charcuterie board.
Reheating Sült:
- If the Sült has been refrigerated or frozen, you can gently reheat it by placing the slices in a skillet or saucepan over low heat, stirring occasionally, until warmed through.
- Avoid heating the Sült too quickly or at a high temperature, as this can cause it to become watery or lose its firm, gelatinous texture.
By following these storage and serving guidelines, you can ensure that your homemade Sült remains fresh, flavorful, and visually appealing for all to enjoy.
Common Mistakes to Avoid When Making Sült
While Sült-making may seem like a straightforward process, there are a few common mistakes that can derail your efforts. By being aware of these potential pitfalls, you can ensure a successful Sült-making experience:
- Insufficient Simmering Time: Rushing the simmering process can result in a Sült that lacks the necessary gelatin content, leading to a soft or watery final product.
- Overcooking the Broth: Simmering the broth for too long can cause the gelatin to break down, resulting in a thin and runny Sült.
- Improper Gelatin Preparation: Failing to properly bloom or dissolve the gelatin can lead to clumping or uneven setting of the Sült.
- Inconsistent Chilling: Unevenly chilling the Sült mixture can cause it to set at different rates, resulting in an uneven or lumpy texture.
- Overcrowding the Molds: Pouring too much Sült mixture into the molds can cause the Sült to expand and overflow, leading to a messy and uneven final product.
- Excessive Stirring or Agitation: Vigorous stirring or handling the Sült during the cooling process can disrupt the setting and lead to a less-than-desirable texture.
- Improper Storage: Storing the Sült improperly, such as not covering it or exposing it to air, can cause it to dry out or develop an unappetizing skin.
By being mindful of these common pitfalls and following the recommended techniques, you’ll be well on your way to creating Sült that is consistently flavorful, firm, and visually appealing.
Tips and Tricks for Perfecting Your Sült-Making Skills
As you embark on your Sült-making journey, here are some additional tips and tricks to help you achieve the best results:
- Use High-Quality Ingredients: Opt for the freshest and highest-quality meat, bones, and other ingredients to ensure the best flavor and texture in your Sült.
- Experiment with Mold Shapes: Try using a variety of molds, such as individual ramekins, loaf pans, or even decorative silicone molds, to create visually interesting and unique Sült presentations.
- Chill the Molds: Placing the molds in the refrigerator for 15-20 minutes before pouring in the Sült mixture can help the mixture set more quickly and evenly.
- Adjust Seasoning to Taste: Don’t be afraid to taste and adjust the seasoning of your Sült mixture as you go, adding more salt, acid, or spices to suit your personal preferences.
- Incorporate Leftover Meat and Bones: If you have any leftover cooked meat or bones from previous meals, you can add them to the Sült mixture to enhance the flavor and texture.
- Experiment with Flavors: Try infusing your Sült with different herbs, spices, or even fruit juices to create unique and creative variations.
- Slice the Sült Carefully: Use a sharp knife and a gentle sawing motion to slice the Sült, ensuring clean and even cuts.
- Serve with Complementary Accompaniments: Pair your homemade Sült with crusty bread, mustards, pickles, or a simple salad to create a well-rounded and satisfying meal.
- Document Your Process: Keep notes on the recipes, techniques, and results of your Sült-making experiments to help you refine your skills and develop your own signature style over time